Introduction
The D-ID Agents Streaming API allows you to use D-ID’s AI tools to generate videos of our high quality digital humans, in real time. This powerful functionality opens up various use cases, such as virtual assistants, interactive broadcasting, online education & training, and more. This document provides an overview of the Agents Streaming API's features and guides you through the steps required to set up a video streaming session in real time.
The Agents Streams endpoints are the low-level APIs used under the hood by the Agents SDK.
While the SDK provides a streamlined and developer-friendly experience, you can interact with these endpoints directly if you prefer a more hands-on approach or need greater control over the integration.
Keep in mind that this method is more advanced — it involves manually setting up WebRTC functionality alongside REST API calls, resulting in a more complex setup than using the Agents SDK.
If you prefer or need to work at this level, the following guide will walk you through the process.
Please note: The creation of Agents and Knowledge bases should be handled through the Agents Creation endpoints or directly within the D-ID Studio.
When Not to Use Streaming

Streaming Protocol
D-ID’s Agents Streaming protocol is based on WebRTC (Web Real-Time Communication) which is a technology that enables real-time communication, including audio, video, and data streaming, directly between web browsers or other compatible applications. It establishes a peer-to-peer connection between the participants, allowing for efficient and low-latency streaming. To learn more about WebRTC and its underlying concepts, you can visit the WebRTC website. In the context of this document, we'll focus on the key aspects related to setting up a video streaming session.
Terminology
create a new stream SDP Offer
start a stream ICE Candidates
submit network information


Getting Started
Fetch the Agent ID
Fetch the previously created Agent's ID
- Via D-ID Studio: in the Agent Embed option -
data-agent-idin the code snippet. - Via API: Utilize the Get Agents endpoint (to get a list of all your Agents), or Get an Agent (to see only a specific one, by agent
id)
Connect (WebRTC & Streams Endpoints)
➤ Create a new stream
To initiate a video streaming session, make a POST request to /agents/agentId/streams endpoint.
This request will provide you with a unique id (referred to as stream_id in other requests) and a session ID. The stream ID serves as a unique identifier for the streaming session, while the session ID needs to be included in subsequent requests' bodies to ensure they reach the correct server instance.
POST https://api.d-id.com/agents/{agentId}/stream | Create a new stream
{
	"compatibility_mode": "on",
	"fluent": true
}
{
"id": "your_stream_id",
"session_id": "your_session_id",
"offer": "your_sdp_offer",
"ice_servers": [
{
"urls": ["stun:stun.example.com"]
}
]
}Make sure to extract and store both the stream ID (your_stream_id) and session ID (your_session_id) for further usage in subsequent steps.
➤ Start the WebRTC connection and submit network info (asynchronously)
After receiving the SDP offer from the server in Step 2, you need to generate the SDP answer and send it back. To obtain the SDP answer, you can use WebRTC APIs or libraries that provide the necessary functionality. Here is a general outline of the steps involved:
- Create a WebRTC peer connection object in your application and add event listeners to its' different states.
- Set the received SDP offer as the remote description of the peer connection using the WebRTC's
setRemoteDescription()method. - Generate the SDP answer by calling the
createAnswer()method on the peer connection. - Set the generated SDP answer as the local description of the peer connection using the
setLocalDescription()method.
Once you have obtained the SDP answer as a string, send it to the server immediately using the [/agents/{agentId}/streams/{stream_id}/sdp](/reference/startagentconnection) endpoint.
POST https://api.d-id.com/agents/{agentId}/streams/{stream_id}/sdp | Start a WebRTC connection
{
	answer,
	session_id: "your_session_id"
}
Do not wait for ICE candidates - SDP submission and ICE gathering happen in parallel.
While (or right after) sending the SDP answer, you must gather ICE candidates and send them asynchronously to complete the WebRTC handshake. ICE candidates allow the peers to discover and establish an optimal network path for communication.
Listen for the icecandidate event on your peer connection object and send each ICE candidate to the server using the [/agents/{agentId}/streams/{stream_id}/ice](/reference/addicecandidateagent) endpoint.
Replace {stream_id} with the stream ID obtained in Step 2.
From each ICE candidate you receive, send the candidate, sdpMid, and sdpMLineIndex attributes with your session_id.
When event.candidate === null, send a final POST with just the session_id to signal the end of ICE gathering.
POST https://api.d-id.com/agents/{agentId}/streams/{stream_id}/ice | Submit Network information
{
candidate,
sdpMid,
sdpMLineIndex,
session_id: your_session_id
}
Waiting for Connection Readiness:
After sending the SDP answer and the ICE candidates, you need to wait for the WebRTC connection to become ready.
Listen for the onIceConnectionStateChangeand onConnectionStateChange events on your peer connection object and check for their state property.
When their connection states change to connected or completed, the connection is ready to proceed.
Agent Chat / Speak
With the connection established, you can now Chat with your agent and get a streamed video of the LLM response or get a streamed video of your own audio/text input, by using the Speak endpoint.
➤ Chat
1. Create a Chat
Once the Agent is created, you can start chatting with it! To do that, you need to create a new Chat session and later send the communication messages to it.
Chat session is a separate thread of conversation between a user and an agent, with its own separate history of messages. The agent uses the history of the chat session to understand the semantic context of that session.
To start a new chat session with an agent, make a POST request to Create a Chat endpoint.
The response will contain a unique id for the created Chat - referred to as chatId in other requests. Code example:
POST. https://api.d-id.com/agents/{agentId}/chat | Create a Chat
2. Send a Message to a Chat
Use the chatId from the previous message, use the following endpoint to return a streamed video answer from the Agent (D-ID LLM)
POST https://api.d-id.com/agents/{agentId}/chat/{chatId} | Send a message to a Chat
{
    "streamId": "this_stream_id",
    "sessionId": "your_session_id",
    "messages": [
        {
            "role": "user",
            "content": "Who was the first visitor of the Louvre?",
            "created_at": "03/03/2024, 18:15:00"
        }
    ]
}
Video will be streamed via the WebRTC connection➤ Speak
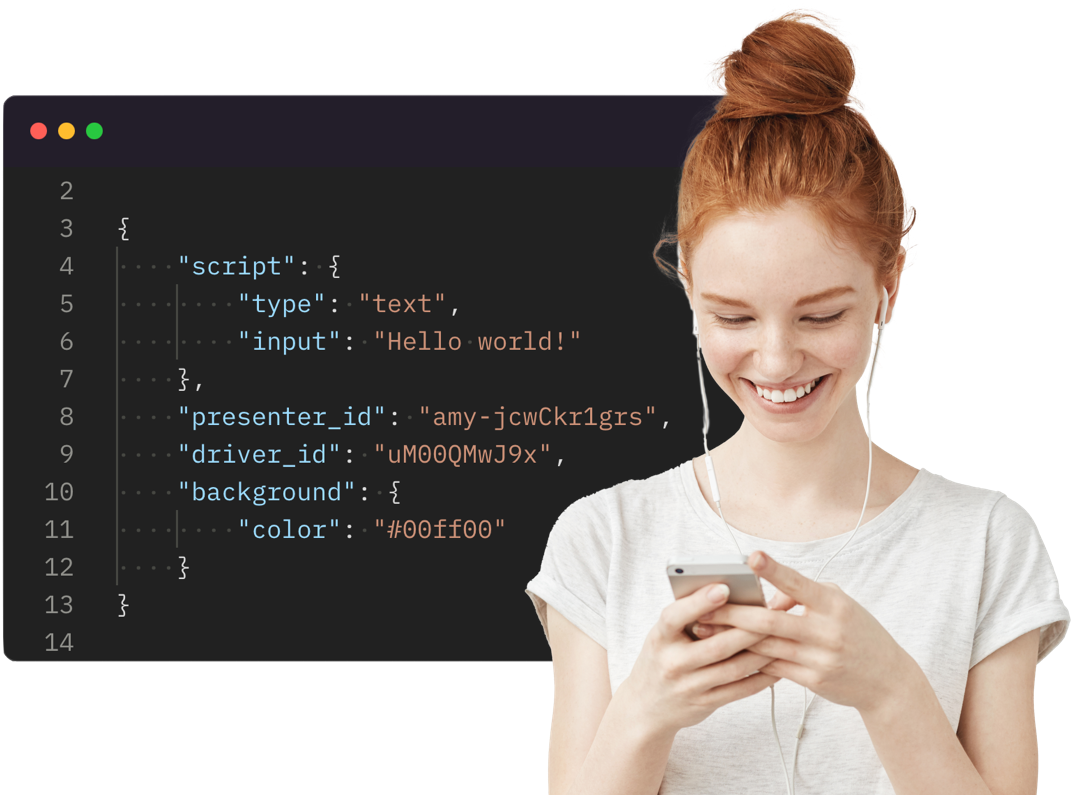
Create a Video Stream
If you wish the Agent to repeat your given text/audio for custom integrations, you can utilize the following endpoint: (This is similar to the Talks Streams / Clips Streams functionality)
POST https://api.d-id.com/agents/{agentId}/streams/{streamId} | Create a video stream
{
  "script": {
    "type": "text",
    "input": "This is an example text"
  },
  "session_id": "your_session_id"
}
Video will be streamed via the WebRTC connectionClosing the stream
To close the video streaming session, make a DELETE request to /agents/agentID/streams/{stream_id} endpoint. This will close the connection and end the session. If no messages are sent within the session for 2 minutes, the session will be automatically terminated.
DELETE https://api.d-id.com/agents/{agentId}/streams/{streamId} | Delete a video stream
{
  session_id: your_session_id
}
Developer Starter Code
For a code example demonstrating the entire process, you can visit the D-ID Agents Demo repository in GitHub.
The repository provides a starter code with both Chat and Speak options to help you get started with implementing the D-ID Agents API in your own applications
Support
Have any questions? We're here to help! Go to the Help Center or send us a message.
Contact Support